This post is by Bernie Carr, apartmentprepper.com
What is the Solo Stove?
It is a small, portable stove that uses biomass (twigs, dried leaves, etc) for fuel. Not needing to bring special fuel is a big advantage: since you can easily find branches and twigs, you are not adding weight to your bug-out bag.
Assembly
The stove is very easy to assemble: just set the cooking ring on top of the stove so that the prongs are on top. That is what your pot will rest on.
Starting the Fire
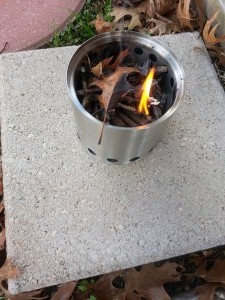
1. First, collect your fuel: in our case, Mr. Apt Prepper gathered up twigs, dried leaves and a few acorns out in the back of our building. Place the twigs in the stove chamber. The twigs or wood pieces should be roughly two to three inches in length.
 2. Make sure the stove is on a level area, away from the wind. We just set it on a paving stone. The Solo Stove’s instructions can be found here.
3. Start the fire. It would have been easier to use firestarter, but we wanted to see how it would perform by just lighting the fuel using matches. The dried leaves caught fire instantly and in a couple of minutes, the rest of the twigs were burning nicely.
 4. We set a pan containing two cups of water on the stove. We continued to add twigs to the fire. The water started to boil in about 10 minutes, which is a lot faster than I’ve experienced with a regular campfire.
Once the fire has died down and stove has cooled completely, all you need to do is empty out the ash. Since the fuel is all organic, you don’t need to worry about polluting the area.
 A bit of soot may cling to the stove but it is easily wiped off.
We put the stove through the paces and it performed well. Mr Apt Prepper kept an objective eye over the test. If we had to come up with an area of improvement it would be to provide more detailed instructions for the inexperienced portable stove user. One thing that is not obvious to a new user is gauging the amount of fuel that is needed. Using dried twigs, the stove did not give off much smoke at all, which is great for a bug-out stove, when you don’t want to attract a lot of attention with your cooking fire.
Long time readers know I am always on the look-out for lightweight portable stoves to test out, having had less than stellar results in the past. Living in an apartment in the city, we cannot deny the possibility we may have to bug out if there were an extended emergency. In addition, the Solo Stove is ideal for camping and backpacking as well.
© Apartment Prepper 2012
For beginning preppers


I was just checking back to see what the comments were on this post. I looked at the site and think I will probably order one. I’m already done with xmas shopping and don’t have the extra right now. I have a number of camp stoves, propane, multiple types of gasoline and white gas, and this just makes since. I’m looking at doing a longish trip with the kids and this would be ideal. No carrying fuel canisters.
Hi countrygirl, I like not having to carry extra fuel. I have not seen any other comments about this post. Thank you!
No way I’m paying $70 for something I can make nearly for free out of a few empty tin cans – and the directions to make them are all over the net.
Hi Kitty, True, there are ways to make it low cost or no cost, but some folks may not feel inclined to create one. It’s just one the options available and certainly we encourage everyone to do research and decide what is best for them. Thanks for the comment.
I like the concept of this stove but I agree with Kitty. So easy to make your own and the homemade stoves are also lighter. Tin cans or pop cans – they both work great.
Some people really don’t want to take the time to do this and that is fine, but I think it is an important part of being prepared – knowing how to do something yourself. Even if people plan to buy a commercially made stove, I would still recommend making their own stove. (Also, to make one that fits their family’s needs. One person may only need a small pop can stove; more family member may need something more akin to this stove.)