
Written by Kyt Lyn Walken
“You are what you eat, so don’t be fast, cheap, easy, or fake.”
Unknown
Energy bars are a great addition to your diet whether you use them for emergencies or as snacks while spending time in the outdoors.
The pros are solid: light to carry, easy and fast to eat, and they fit comfortably in pockets, in your backpacks and even inside the smallest pouches.
Energy bars allow you to have fast food and within easy reach! Plus, they are healthier than candies or any other kind of sweet. They also have a long shelf life.
You can purchase them everywhere, from big supermarket chains like Walmart to gas stations, from duty free shops inside airports or vending machines.
They aren’t that expensive too, but what if you want to test your cooking skills and try to make them at home or out in the woods?
You won’t only cut the expenses related to the packaging itself, but you will also have the ability to produce them in large scale for you and for all the family members.
Make some calculations and think about it.
Benefits from making survival bars by yourself
“Your diet is a bank account. Good food choices are good investments.”
Bethenny Frankel
The benefits are several:
1. You can select the ingredients of your choice
2. You can make a lot
3. You can cut them in the manner you prefer – square, rectangular.. so you can stuff them even in the most narrow parts of your gear
4. You can decide the best method to wrap them (kitchen film, aluminum, bamboo boxes…)
5. You save time from purchasing them somewhere else
6. You can involve your family in making them
Making the right choices means you invest in your health and in your future too. Sounds very good, doesn’t it?
In this article we will see how we can produce some survival bars with the best selection of ingredients in terms of energy and calories.
Additionally, we will learn how to bake granola bars at home and in the great outdoors.
Ingredients and nutrients
“Healthy eating is a way of life, so it’s important to establish routines that are simple, realistically, and ultimately livable.”
Horace
Be mindful when you select and pick up the ingredients you want to include in your survival bars. They should be the result of careful thoughts about what you really need to when you find yourself low on energy. Let’s discuss essential raw materials for our survival bars.
Nuts
Nuts are traditionally known for providing energy.
All the existing types of nuts have all major macronutrients, like:
• fat
• protein
• carbohydrate
Keep in mind that nuts contain a good amount of total protein as well as fat, and vegetarians can get the most out of it.
“[…] In addition, nuts have a low lysine:arginine ratio, which is inversely associated with the risk of developing hypercholesterolemia and atherosclerosis. Carbohydrates are the second highest macronutrient in nuts in terms of total calories provided. The fat fraction is characterized by a high amount of unsaturated fatty acids and a low content of saturated fatty acids. In conclusion, the high content in unsaturated fatty acids, the low lysine:arginine ratio, and the presence of other bioactive molecules (such as fibre, phytosterols, vitamin and other antioxidants, and minerals) make the addition of nuts to healthy diets a useful tool for the prevention of cardiovascular heart diseases.[…]” ( “Nuts: source of energy and macronutrients” – Published online by Cambridge University Press – 19 April 2007)
Nuts are also a good source of:
phosphorus
magnesium
copper
folate
vitamin E
and they are extremely rich in fiber, which is absolutely beneficial for your digestion too!
Fruit
Basically you can add any kind of dried fruit that you like. Most popular are: blueberries, blue raspberries, currants, apple, pear, banana, pineapple, figs.
Nonetheless, you should also new flavors. Even orange, tangerine, citron, lemon, and lime can be very good. I use dehydrated and sugared lemon.
Do not forget that to each single kind of fruit corresponds to specific vitamins. So you can actually prepare some energy bars from scratch paying attention of what you want to get out of it.
Not only vegetable protein, I mean, but also Vitamin A, B, C.
By employing a good food dehydrator, you can process your fruit by cutting it in thin slices or tiny pieces (even better!) and mix them in the pastry.
My suggestion is to organize your food storage by dedicating a specific box to contain all the ingredients you need to make granola, and, consequentially, your survival bars.
In this manner you know exactly what you need to prepare, let’s say, “survival bars” with Vitamin C (with citrus, etc.).
Grains
You have plenty of choice when it come to go for some grains you want to add to your pastry.
The most used are: oats, oat bran, puffed rice, puffed millet, puffed barley, puffed spelt, puffed kamut.
Seeds
In recent years, some companies started to introduce some seeds inside the preparation of their energy bars. My personal suggestion is.. do not over abuse them!
In fact, our digestive system isn’t fit for some of them.
Usually, chia seeds and black/white sesame seeds are what you can find the most.
Thickener
In order to keep your pastry together and well blended, you definitely need a “thickening agent.”
Far from getting some chemical stuff you don’t really need to, you can go 100% easy and… organic!
As in the case of grains we mentioned above, you have plenty of options, like:
- Coconut oil
- Sesame oil
- Maple syrup
- Honey – in all the different varieties
- Peanut butter
- Almond butter
- Pistachio butter
- Date Palm oil
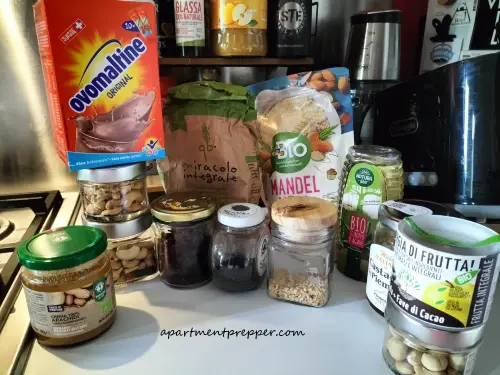
You can also add some jaggery, which happens to be more fit for granola than processed cane sugar. Jaggery is similar to muscovado, commonly used in Portuguese, British or French cuisine. I actually use a lot of jaggery sugar because it is considered healthier than regular sugar. I’ve even used the Swiss beverage powder Ovomaltine as a sweetener as well.
How to make survival bars from scratch – at home
“Let food be thy medicine, thy medicine shall be thy food.”
Hippocrates
Beside the nice amount of perks we covered in the previous paragraphs, you will also be surprised by how fast is the overall preparation of your granola pastry. Beside the essential elements, you just need a fridge (or at oven) and… no more than twenty minutes of your time. And I am speaking for all the customizable recipes you have in mind!
Preparation
Put in a bowl all the ingredients of your choice such as nuts, fruit, grains, thickener, and seeds.
To make 10-12 regular bars, you will need:
1 lb of oats
1 cup of sesame seeds
2 cups of honey or peanut butter
1 cup of dehydrated raspberries
If you like to cook without measurements, go with an equal amount of
nuts
dried fruit
sugar (or sweetener)
fat
You can also add some dark/milk or white chocolate chips.
The proportion depends on the dimension – and number of baking sheets you have at your disposal.
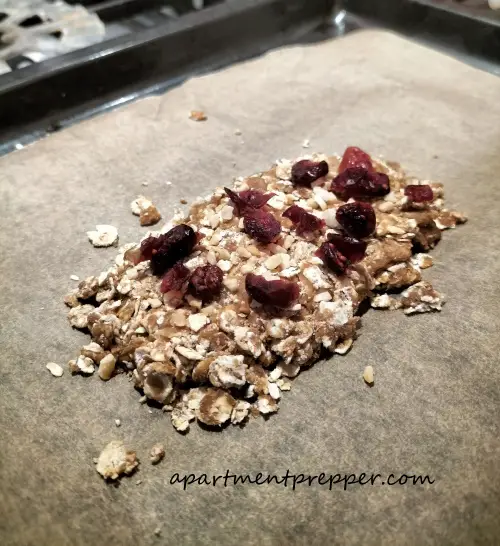
Mix them together in order to create a pastry.
Press this inside a baking dish.
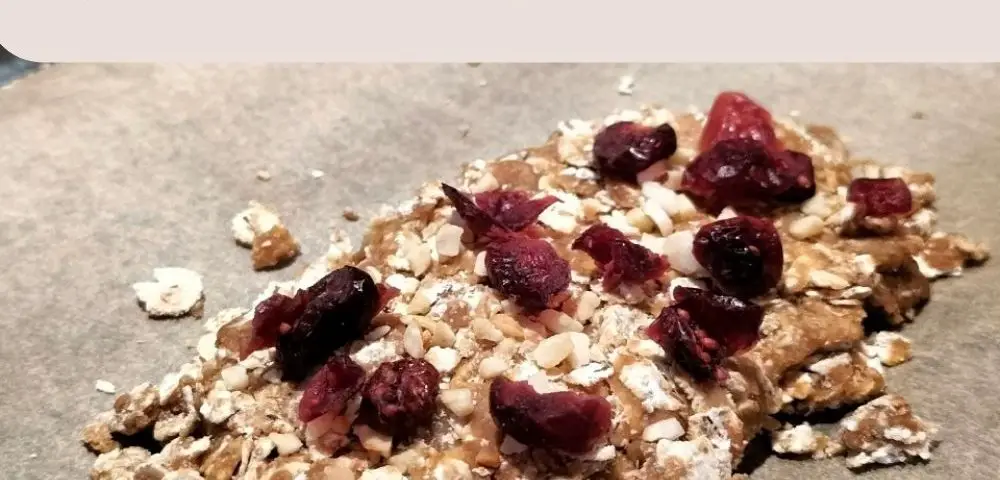
Then store inside the fridge for at least 3 hours. Later on, you can cut them into slices or small pieces, at your pleasure.
Energy bars can last up to five or even six days in the fridge. You can also freeze them!
In case you prefer to bake them, keep them in the oven at 356 F for no more than 10 minutes. Check their baking repeatedly and carefully, in order not to spoil them.
Once out of the oven, leave it cool for at least one hour.
This second preparation may turn them a little bit crispy… As I personally prefer them.
How to make survival bars from scratch – in the great Outdoors
“You don’t have to eat less, you just have to eat right.”
Unknown
What if you want to prepare your survival bars in the great outdoors? If you have a fire, you can definitely make it. All you need to use is a collapsible bowl, a spoon, and…. an upper grill to make sure they won’t get burned. When I cook it outdoors, I simply use a bowl to mix everything, than I lay the bars to cook on a skillet or on a grill.
Few minutes of preparation, and at least 60 minutes to cool down and… they are ready to be cut in pieces or broken with your own – clean! – hands!
Conclusion
“The food you eat can be either the safest and most powerful form of medicine or the slowest form of poison.”
Ann Wigmore
We don’t have to be super chefs to make these survival energy bars from scratch.
Add creativity, and go for it! Making survival bars could turn out to be not only a good investment, but also a way to share your knowledge with the community of preppers out there.
About the author
Kyt Lyn Walken is Official Representative and Instructor for Hull’s Tracking School (Virginia) and Antipoaching Certified Ranger for Conservation Rangers Operations Worldwide Inc. (Colorado).
She’s a long time Prepper and Survivalist and she wrote several articles and essays on this topic.
If you found this article interesting or helpful, please consider helping us out (without costing you anything)! We are an affiliate of Amazon.com, which means we received a small commission if you click through one of our Amazon links when you shop, at totally no cost to you. This helps keep the lights on at the blog. Thanks!

One comment